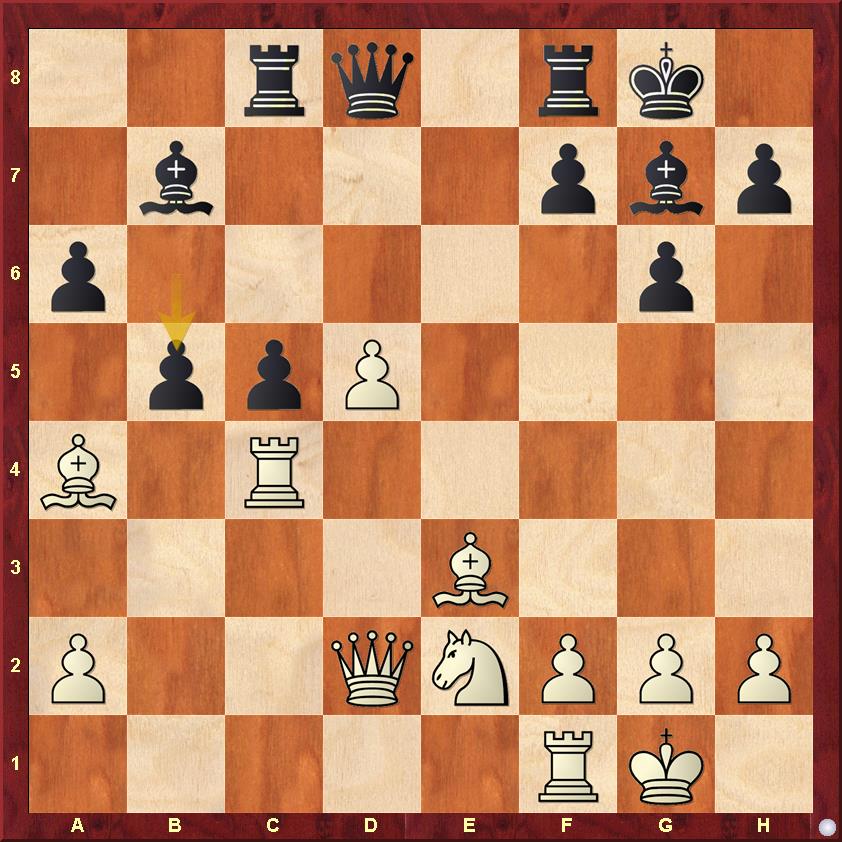
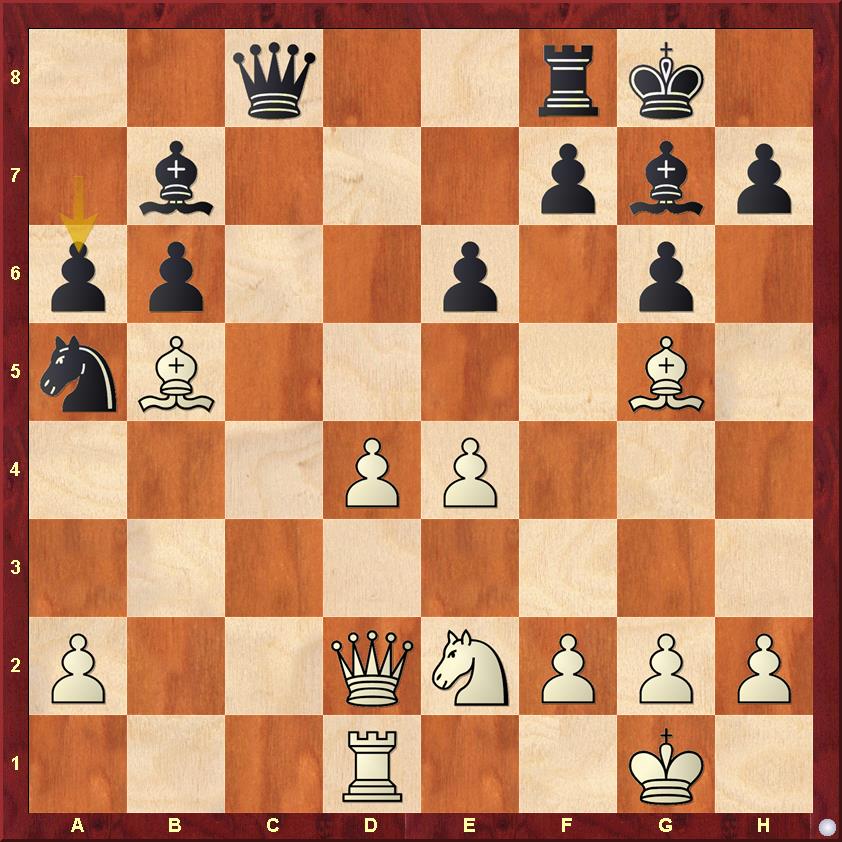
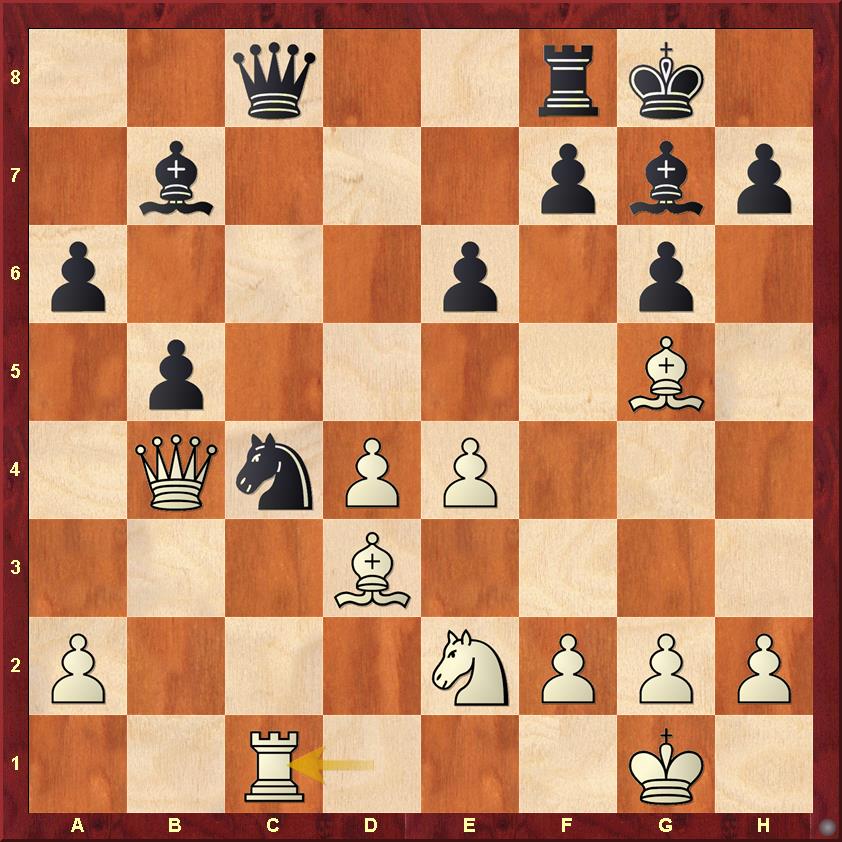
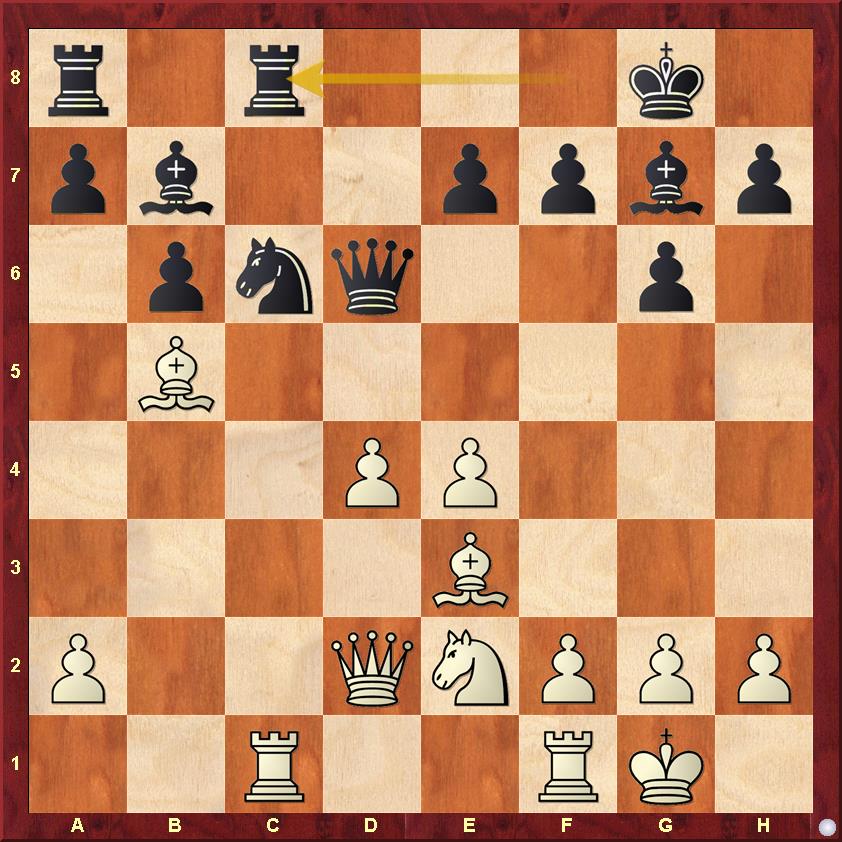
With 8 Rounds to go, we have a sole leader on +3 - Ian Nepomniachtchi has been on fire in this event, playing quality chess and pressuring his opponents into making mistakes. We are seeing the best of Ian in this event, and without making any radical claims he should be considered a favourite to win the title, notwithstanding his health issues, due to the lead he possesses. With this general background out of the way, let us get into the crux of this article - finding resources which the Candidates either missed or underestimated.
I have found tangible improvements in Caruana-MVL and Giri-Caruana, so we will focus on those two first. I will then present an alternative way to play the theoretical Najdorf in Alekseenko-MVL, and lastly I will point out a very imaginative idea (though not necessarily an improvement) in Wang-Alekseenko for Black, all of these courtesy Fat Fritz and my chess filters! Onwards!

All the analysis in this article has been done with the help of Fat Fritz
Giri-Caruana
Why do I start with this game? Well, think of this as the biggest find of my analytical career till now! It seemed to me during the live broadcast that the general plan chosen by Fabi according to his opening preparation was sub-optimal, so I decided to check for improvements. The results are quite astonishing frankly - after more than 9 hours of work I have compiled a rather astonishing idea that as far as I know has never been tried in similar structures! Let's have a look:

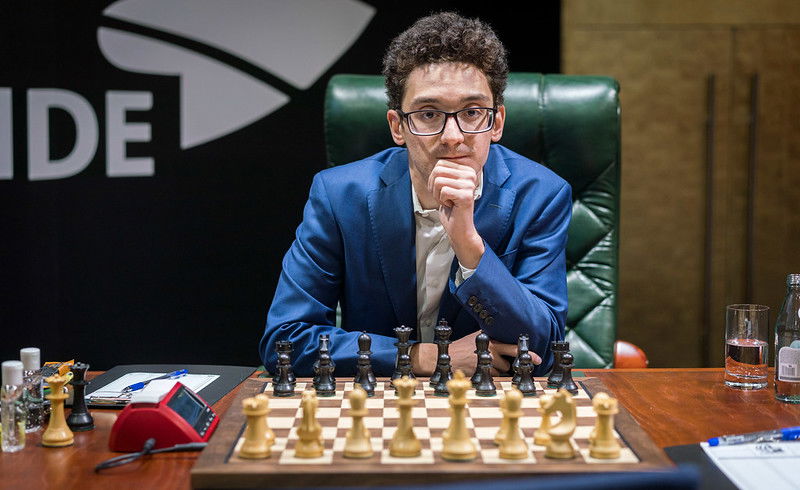
Caruana's Slav has not gone according to plan so far, but this improvement should change things in the line he chose! | Photo: FIDE Candidates 2020
Giri-Caruana

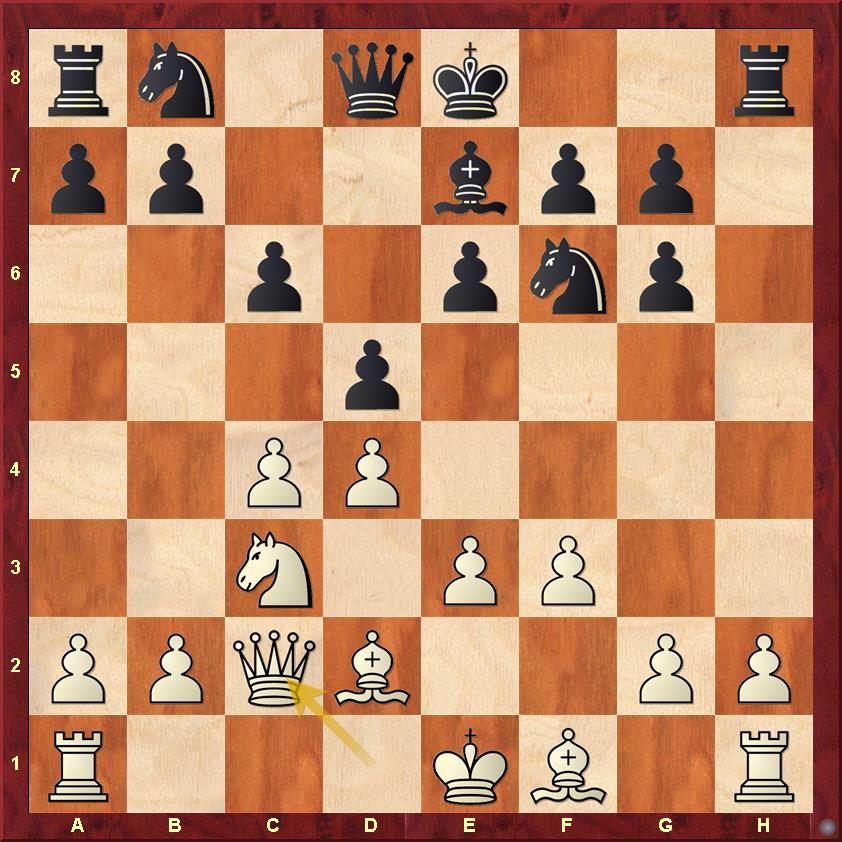
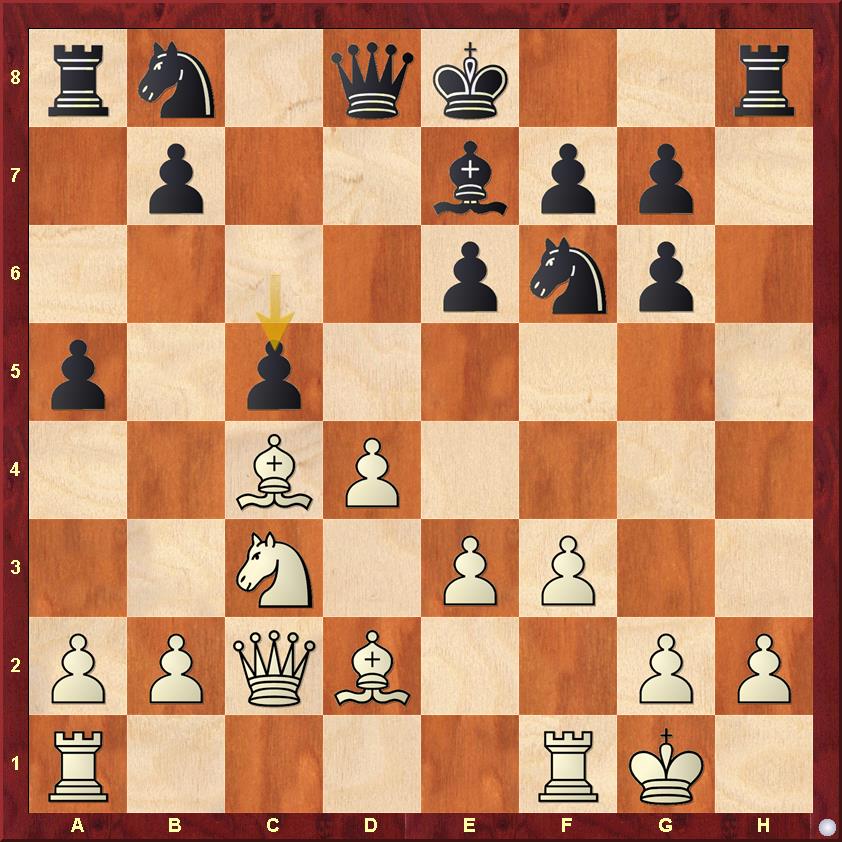
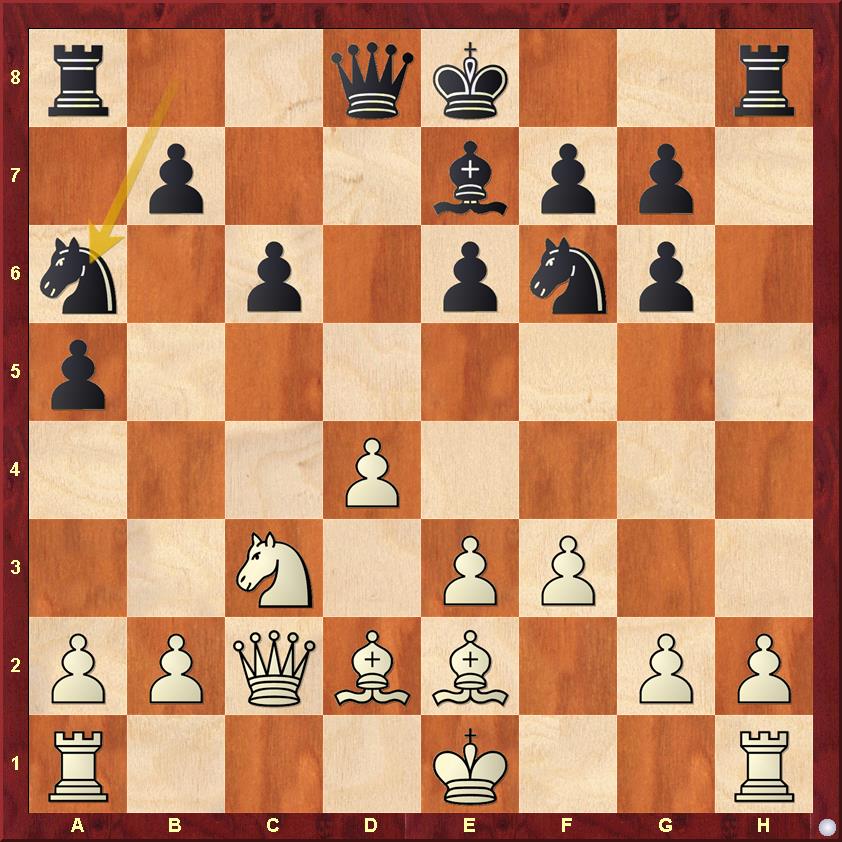
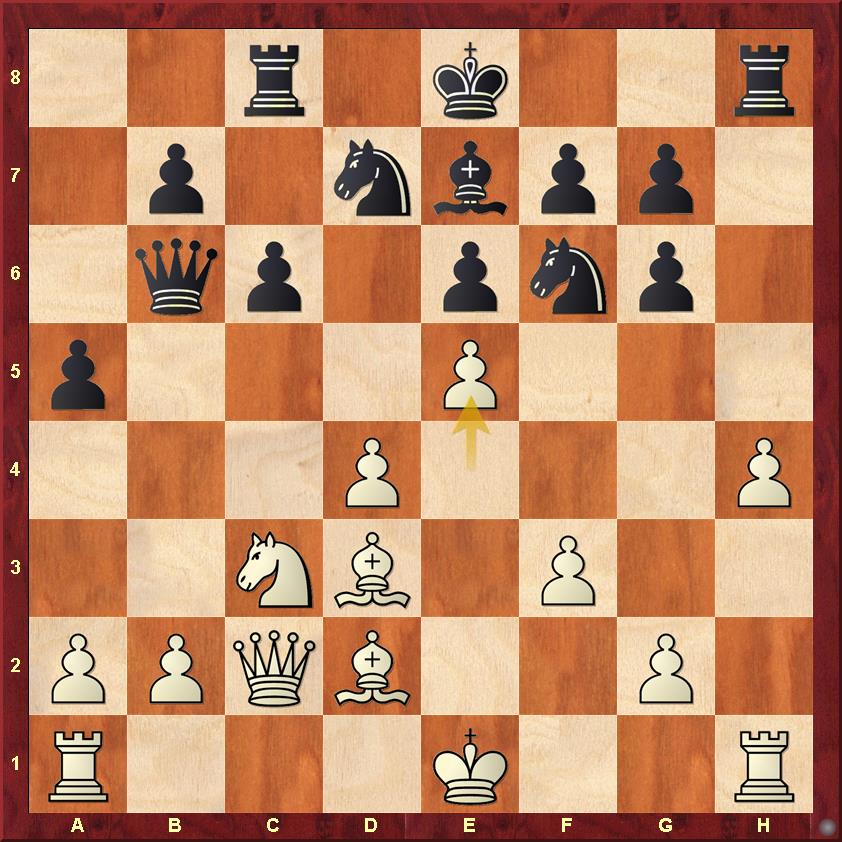
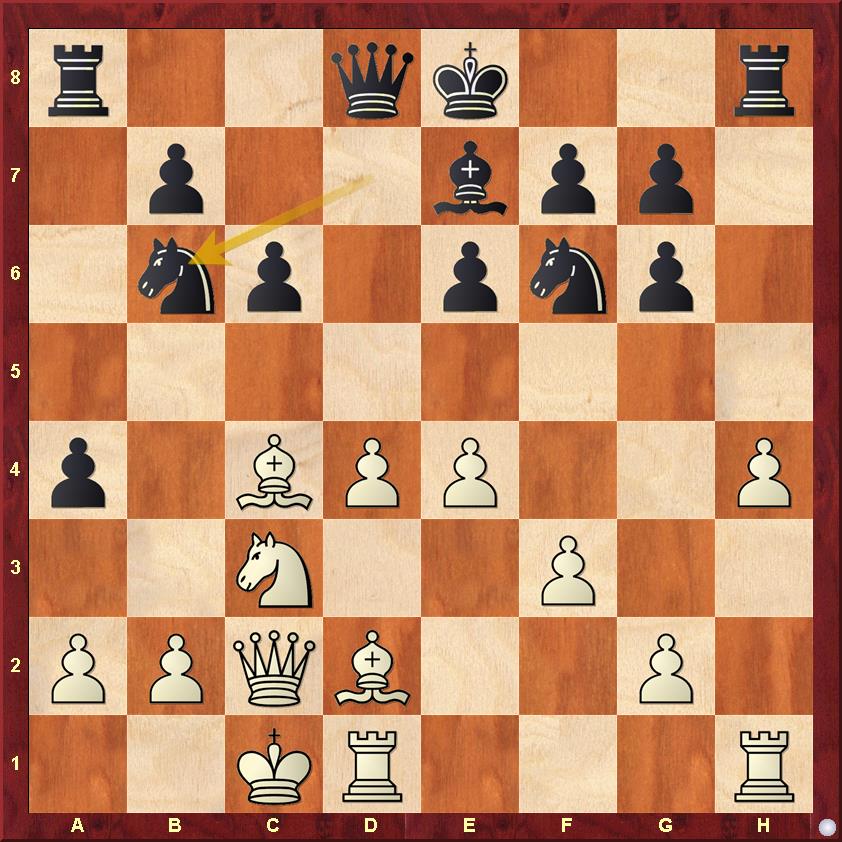
This is the position after White's 10.Qc2!?, which is a rare move according to the databases, but a perfectly logical continuation. Here Caruana continued with 10...Nbd7!? 11.0-0-0 Nb6, but I am not convinced with his play, and decided to find an improvement. Well, here is the idea - Black plays the seemingly anti-positional 10...dxc4!N, which is already taking the game into uncharted territory. After White's logical 11.Bxc4 aren't you wondering why Black took on c4? Here despite White not losing a tempo by taking on c4 directly, I feel that after the next move he should not even have a symbolic advantage! Any guesses?

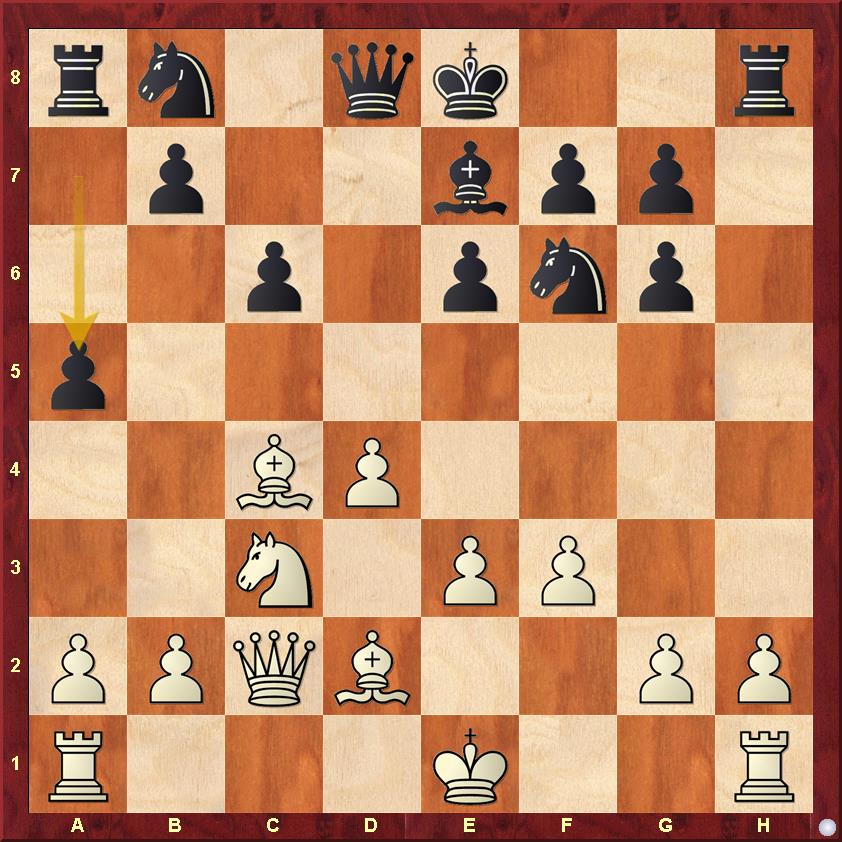
11...a5!! This is the last move that can come to most people's minds here. But Fat Fritz thinks differently. What is the point of this move? Well, common sense indicates that it just gains queenside space, and if Black is allowed to do it he will go b5 and a4 and b4, crushing White's queenside ambitions. Does this mean c5 is chucked out of the window? Not quite! In some positions that pawn break still comes, and Black losing control of the b5 square is not so dangerous - he has the b4 square to compensate for it and White's kingside structure is rather weak, due to the advance of the f-pawn. I have tried to logically explain the ideas of this move, but it is impossible to cover them all, so with concrete variations I hope to convince you that the idea is not only perfectly sound, but also practically dangerous for the player with the White pieces!
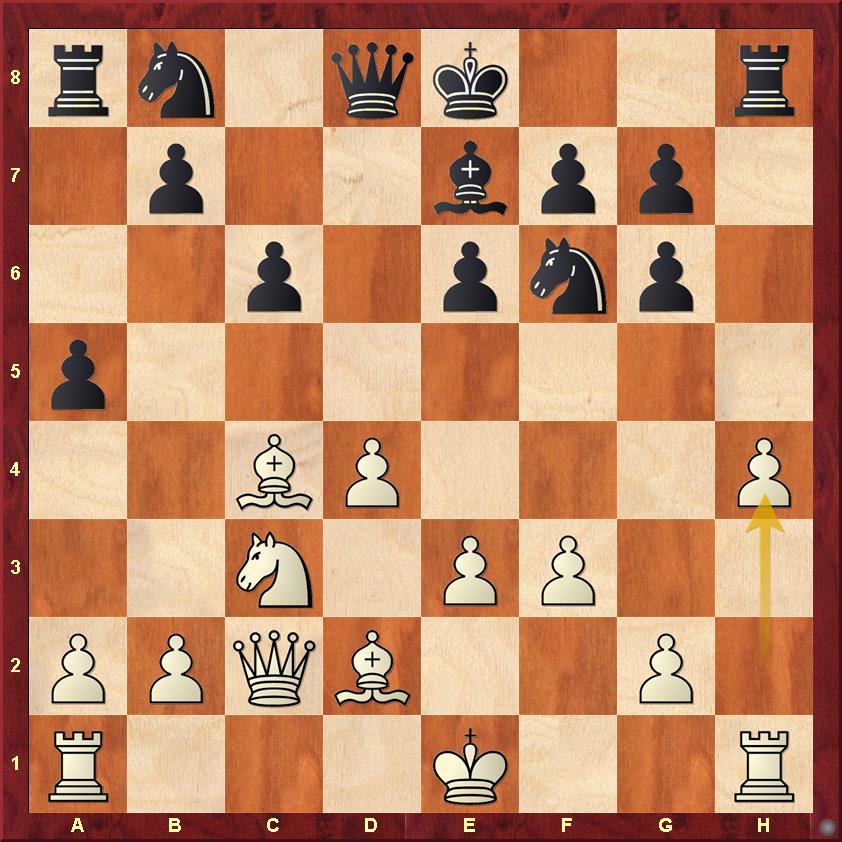
The critical response to Black's wing attack is to counter it with an assault on the other wing with 12.h4!?. We will analyse that move last - let us first check the alternatives for White on move 12:

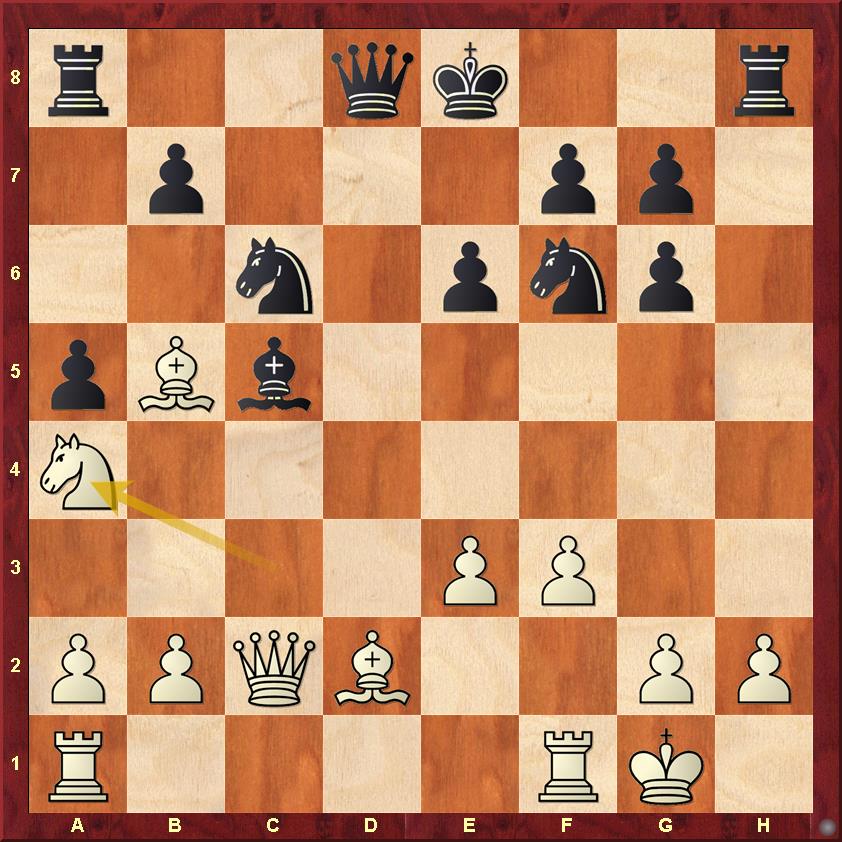
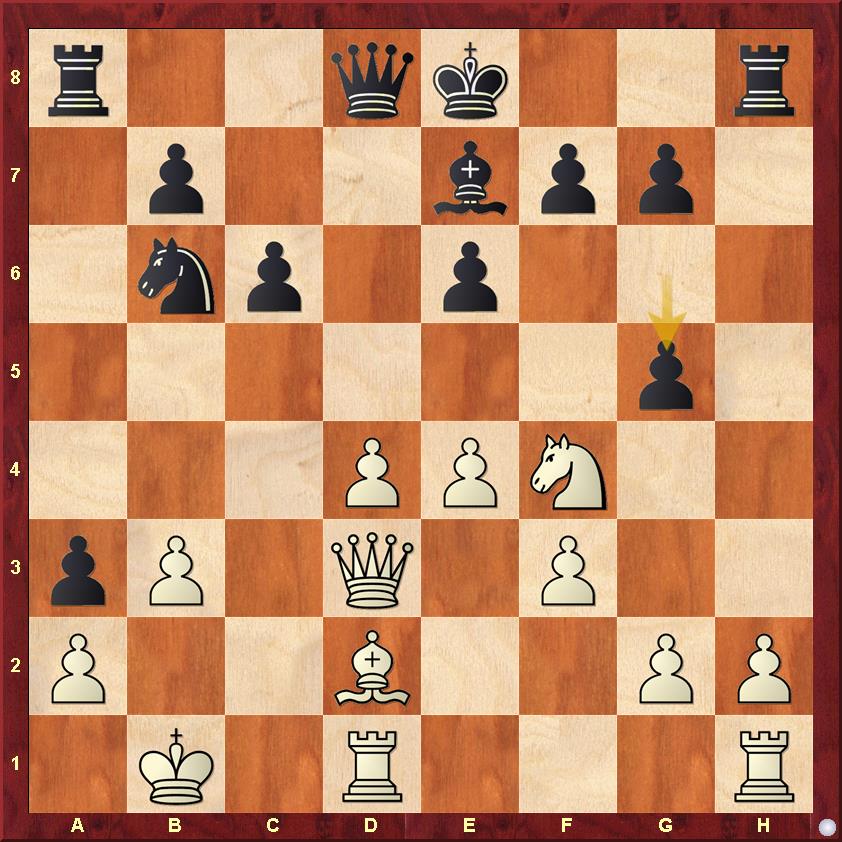
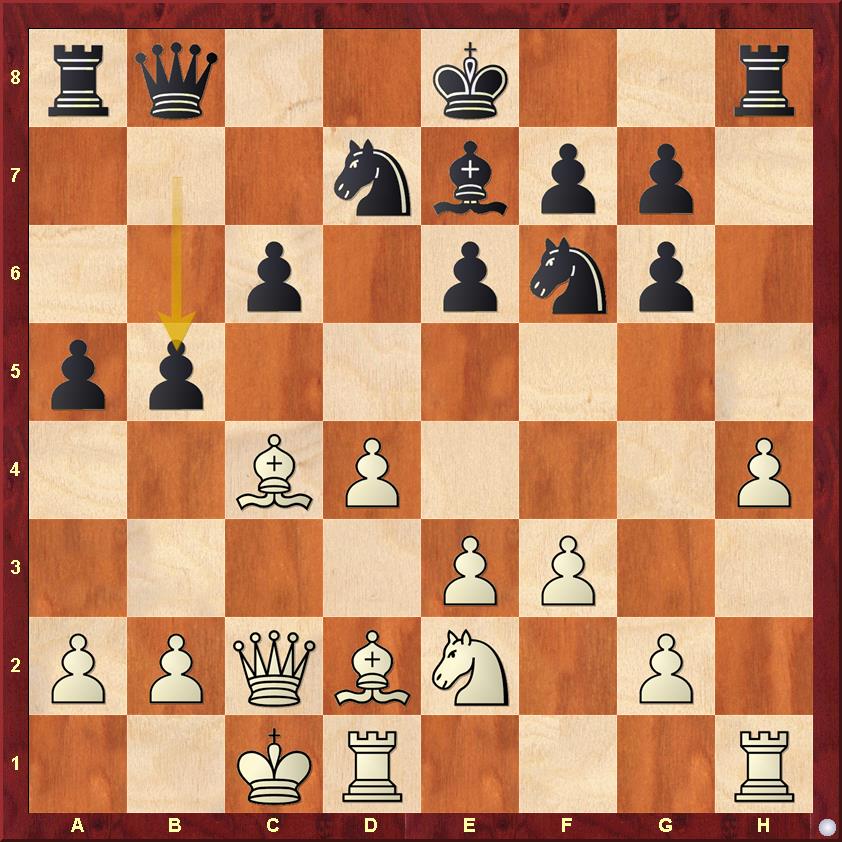
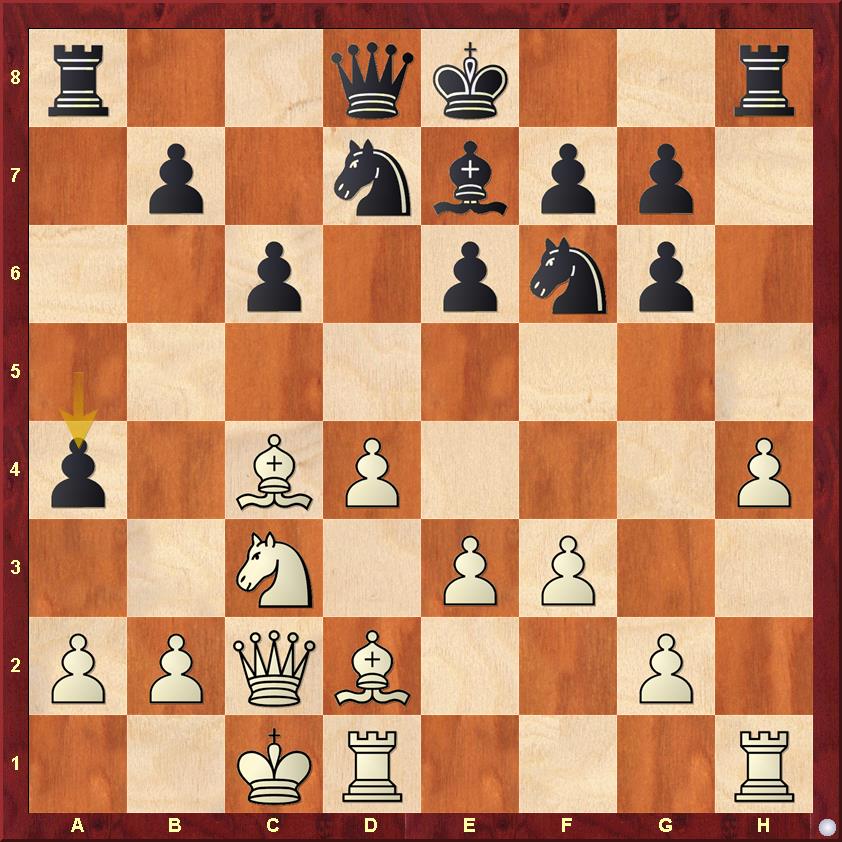
After the natural, but risky 12.0-0 (White castles into a semi open h-file) Black has this nice pawn break with 12...c5!. Does the move a5, weakening the b5 square, come back to haunt us. Not quite! Let us check the position after a few more moves - 13.Bb5+ Nc6 14.dxc5 Bxc5 15.Na4:

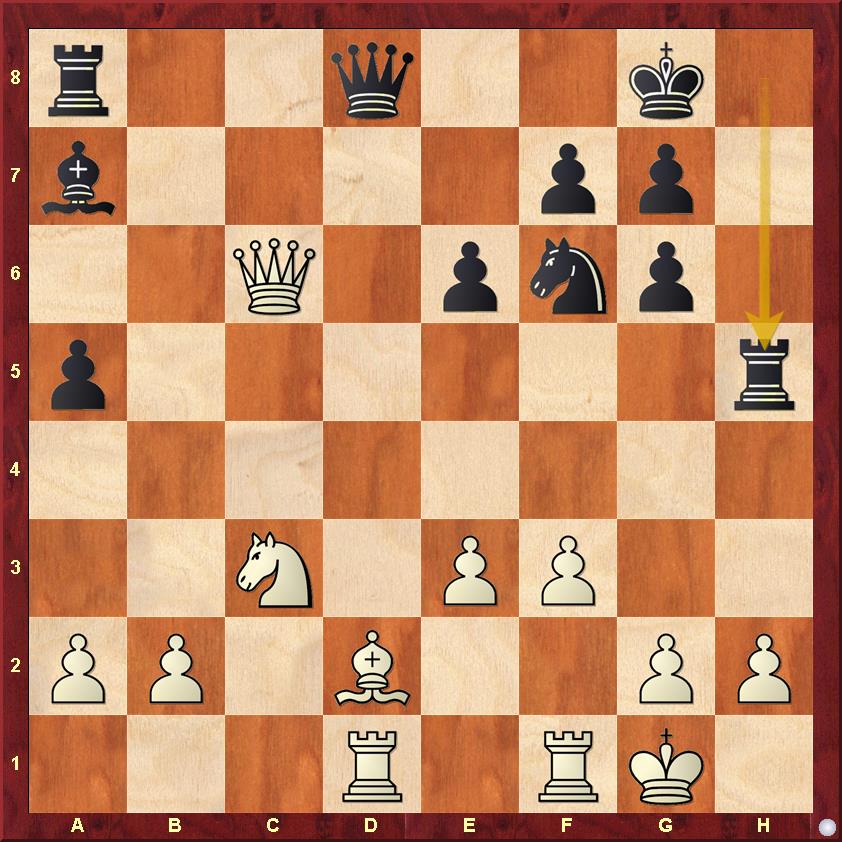
White wins a pawn makes Black lose his castling rights after 15...Ba7! 16.Bxc6+ bxc6 17.Qxc6+ Kf8, but here concrete factors are a lot more important - the rook on the open h-file and the monster bishop on a7 guarantee Black complete compensation. After a few more logical moves we reach the following position.

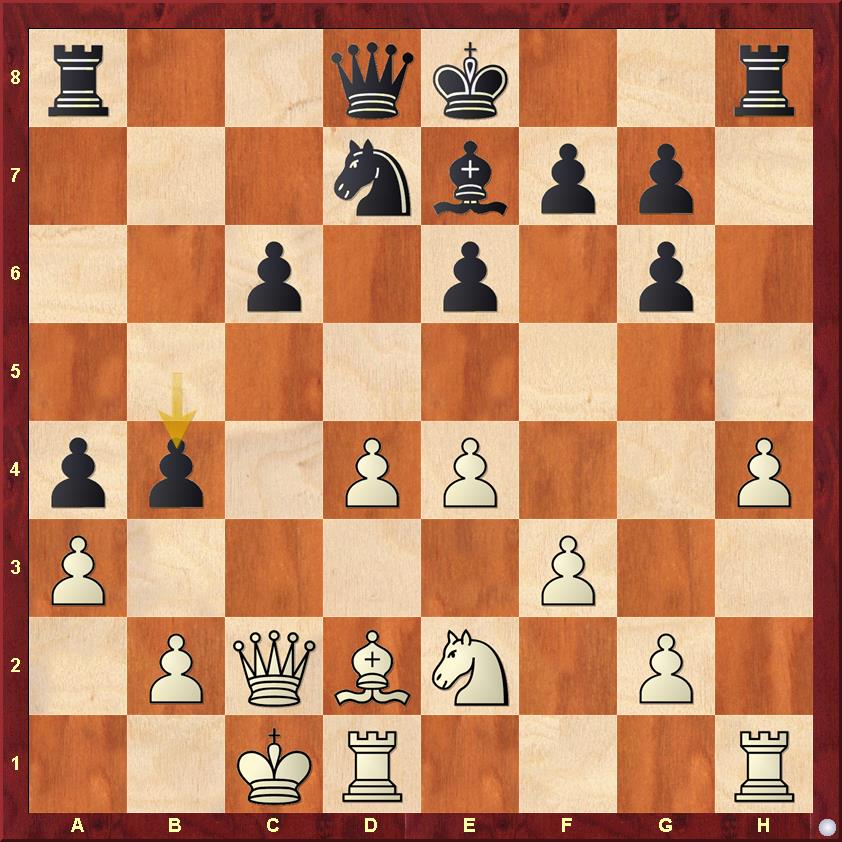
Black is completely fine here - he has the more active pieces and White's king will be under constant pressure. The extra pawn is simply not relevant.

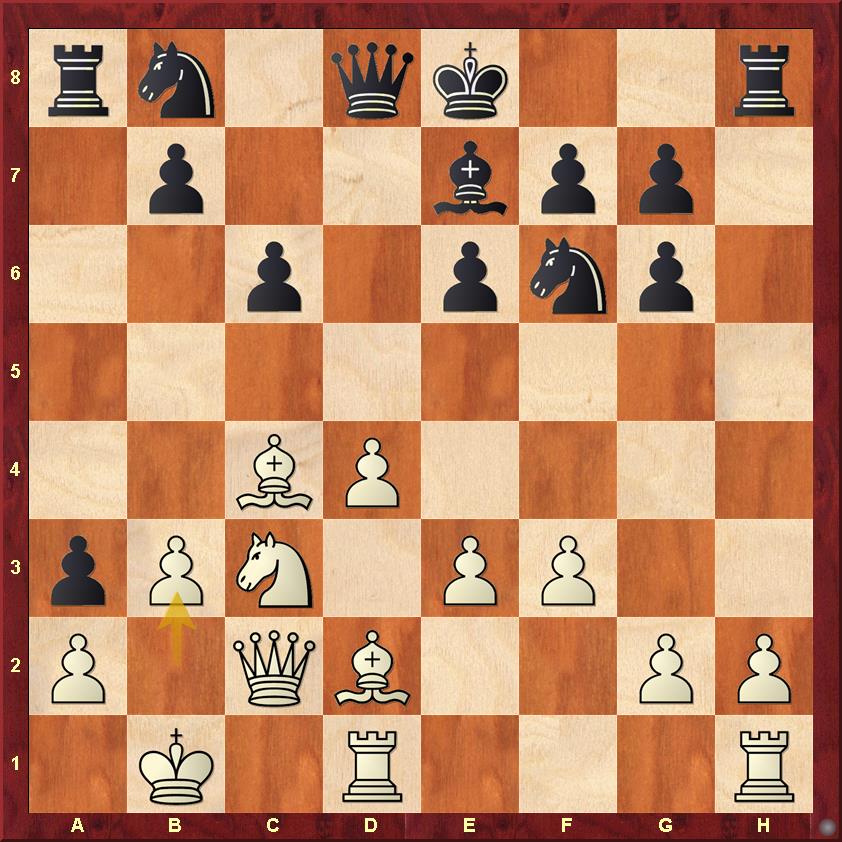
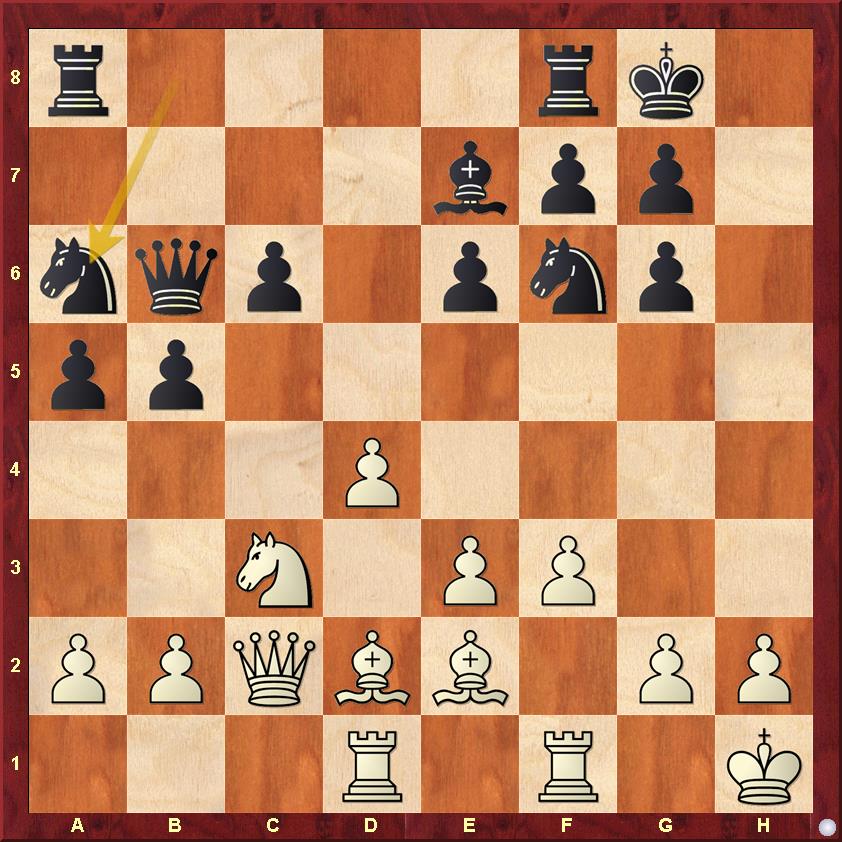
What about 12.0-0-0? Well after 12...a4 13.Kb1 a3! 14.b3 the above position is reached, and shows one of Black's key plans becoming a success - the advance of the rook pawn to create weaknesses around White's king. After a few logical moves we can reach the following diagram:

Black is comfortably equal here - his lack of central space is compensated by the long term weakness of the White king.

To make my lines better, I was using Stockfish in tandem to understand why it doesn't understand Black's ideas! Its choice after decent thought was 12.Rd1 with an evaluation of around 0.20. Now after 12...0-0 13.0-0 (The alternatives can be found in the file) b5 14.Be2 Qb6 15.Kh1, Black has the thematic idea 15...Na6!, preparing c5 and jumping to b4. Not to repeat myself, but Black is fine!

12.Be2!? is actually a clever move, stepping out of any tempo winning b5 moves. However, the catch is that after 12...Na6! White is unable to stop c5 with dynamic equality.

At long last! This move is the most interesting one to analyse, though it can be disputed if it's the best White can do. Black to play 12...Nbd7!, and here we have a further split.

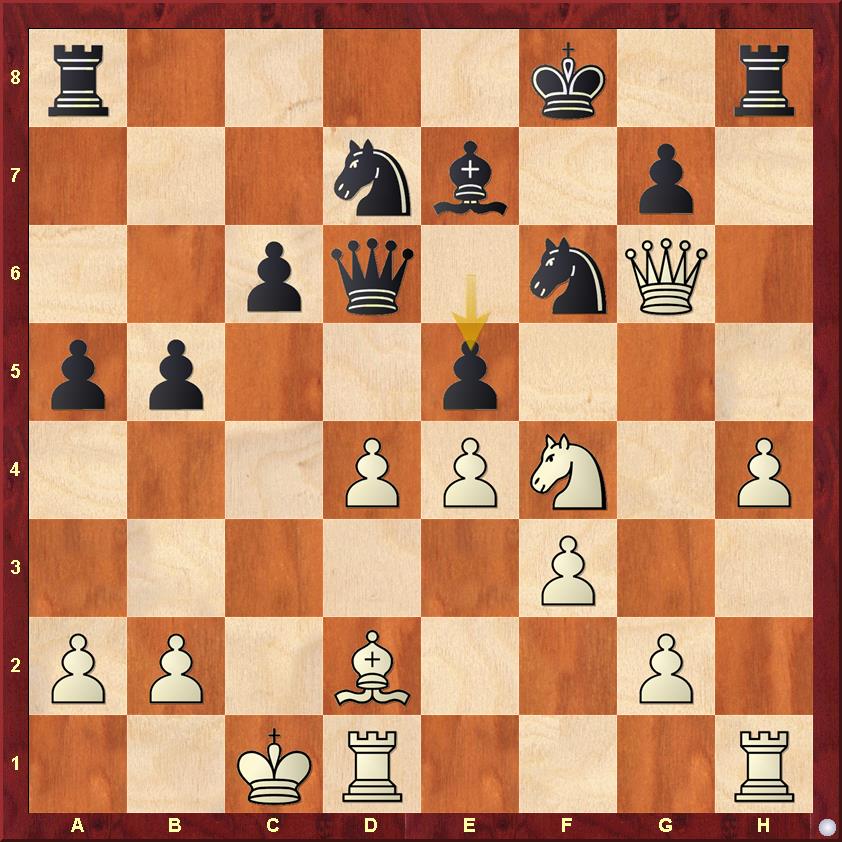
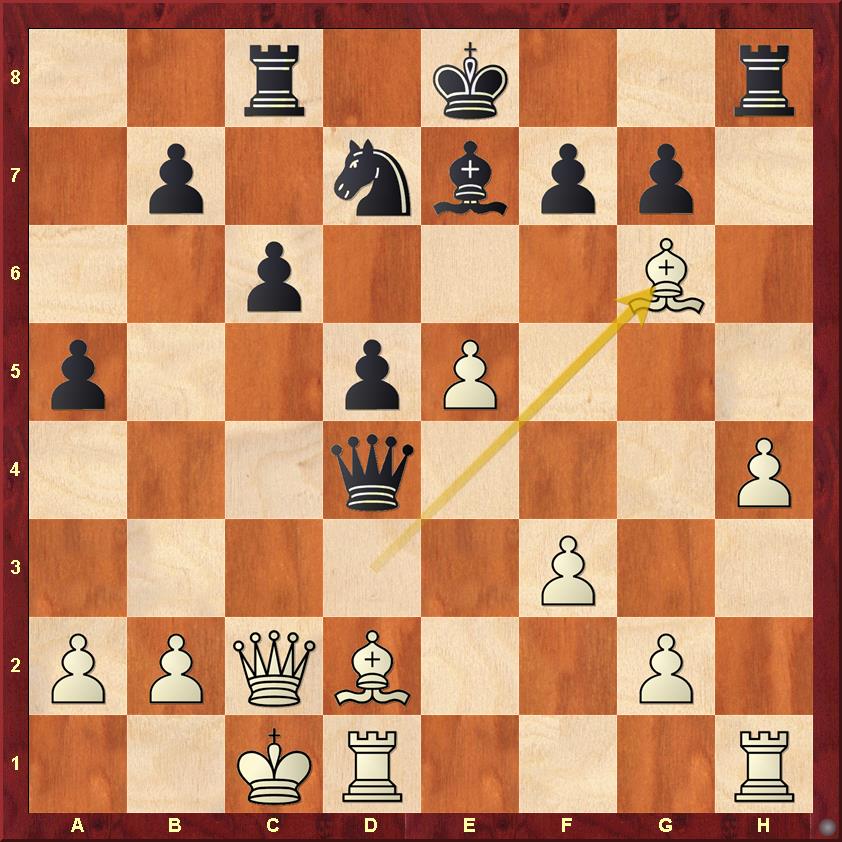
Apart from 13.0-0-0 White has a few additional options. 13.Ne2!? Qb8! 14.0-0-0 b5! is one, where he is forced to go in for the risky line 15.Bxe6!? fxe6 16.Qxg6+ Kf8 17.Nf4 Qd6 18.e4, but here Black has a strong counter.

18...e5! One can continue the analysis from here, but it is clear that Black is in no way worse- White has to prove his compensation for the piece, and it seems to me that he has the tougher task ahead of him.

13.g4 is most direct, discouraging Black from castling short, but it doesn't seem to affect us much - after 13...Nd5! Black takes advantage of the newly available d5 square. After a logical sequence 14.0-0-0 Nxc3 15.Bxc3 Nb6! 16.Be2 Black has to find the only move to fully equalise, but it is not so tough:

16...Bb4! Black is making good use of the move a5!

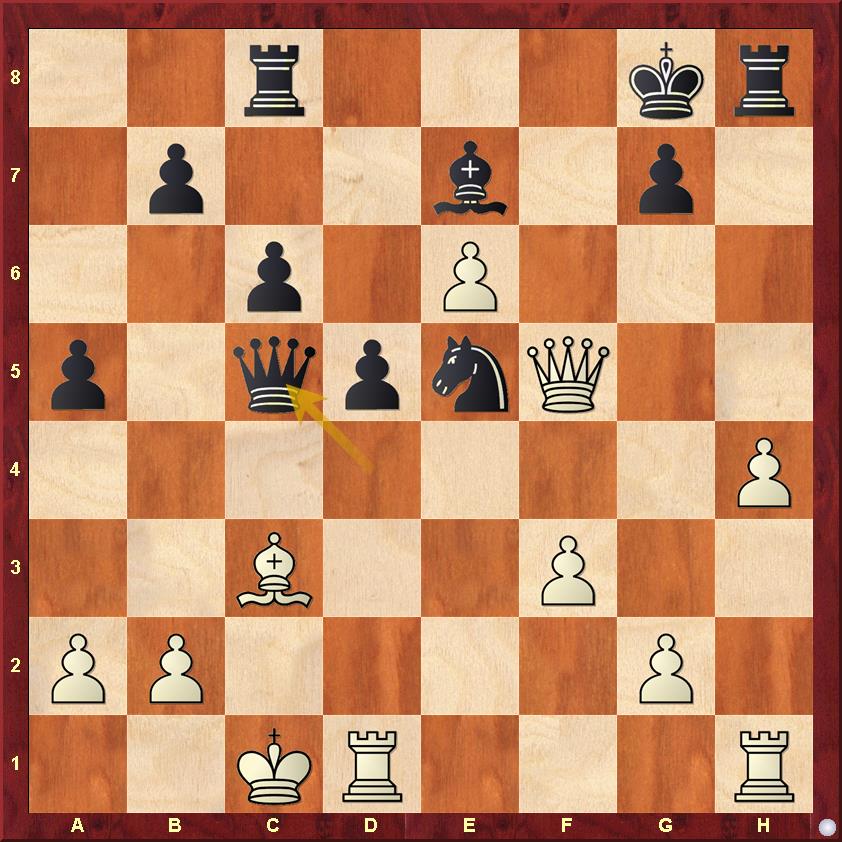
There is the move 13.Bd3!?, stepping out of any Nb6 tricks that win a tempo, but it is a little slow - 13...Rc8 14.e4!? Qb6 15.e5(above) and here Black has a choice between 15...Nd5 (staying active) and the shocking 15...Ng8!, in both cases having equal chances. The choice for the reader to make is based on the position below.

Are you afraid of this sacrifice? If so, don't choose 15...Nd5 (from the note above), and go for 15...Ng8!, which also involves a bit of defense, but is a little safer. However, I prefer principled chess, and the objective evaluation after this is that White is the one who has to prove compensation for the piece, and Black holds on with moves that are relatively easy to find.

After 18.Bxg6!? above we reach this position after a forced sequence. It might seem scary for Black, but he has things under control. Chess is a game where you need to do many things well, and if defense of such positions is something you don't do well, then take it as a challenge and master it!

13.e4!? should also be considered, but this is an improvement for us over the main line - 13...a4! 14.0-0-0 Nb6, with a complex and unclear game ahead. The critical line leads to the next diagram:

With a pawn sacrifice Black distracts White from his kingside attack, and obtains the initiative.

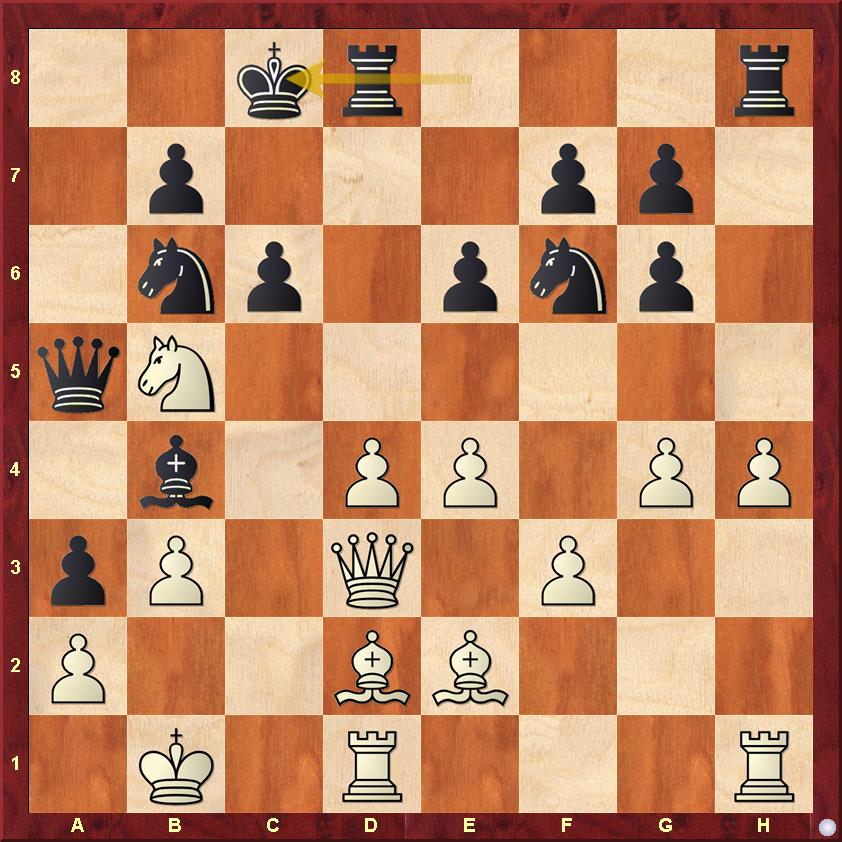
Now back to the main line 12.h4 Nbd7 13.0-0-0. Here Black must make the thematic advance 14...a4!, gaining space and creating weaknesses in front of White's king. After a logical sequence, we can reach the final diagram of this portion:

For reasons of space I didn't cover the line that leads here (consult the notes), but the final position is the culmination of Black's ideas - he has good control of the d5 break and White's advances could quickly become weaknesses. Black is forever fine! (Thanks Adorjan!)
Here are the extensive notes to the novelty 10...dxc4! 11.Bxc4 a5!!:
Caruana-Nepomniachtchi
The other fascinating clash that caught my attention almost immediately. With 1.5/3 it might seem as if Fabi is playing it safe, but his games are anything but dull! He managed to put incredible pressure on the Russian, but Nepo managed to hold after a few inaccuracies from the World No.2. Here, my aim was to initially find an improvement for White, but my resulting analysis is probably relevant to the Black player as well. Let us dig in now:

Hmm...the position is definitely more complex than I thought it was....| Photo: FIDE Candidates 2020

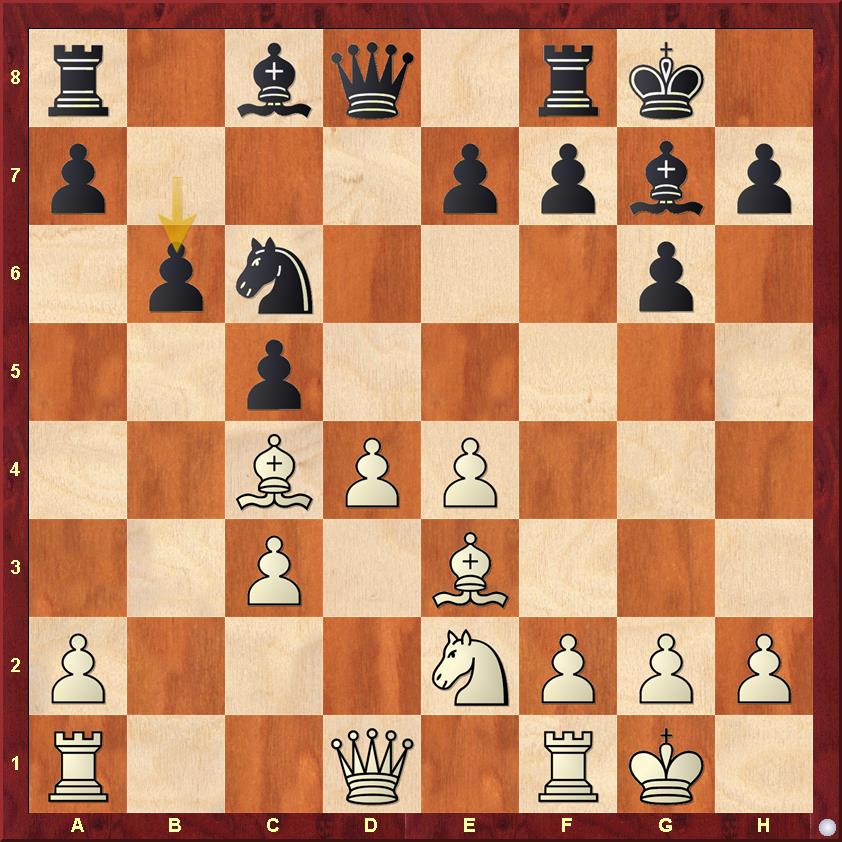
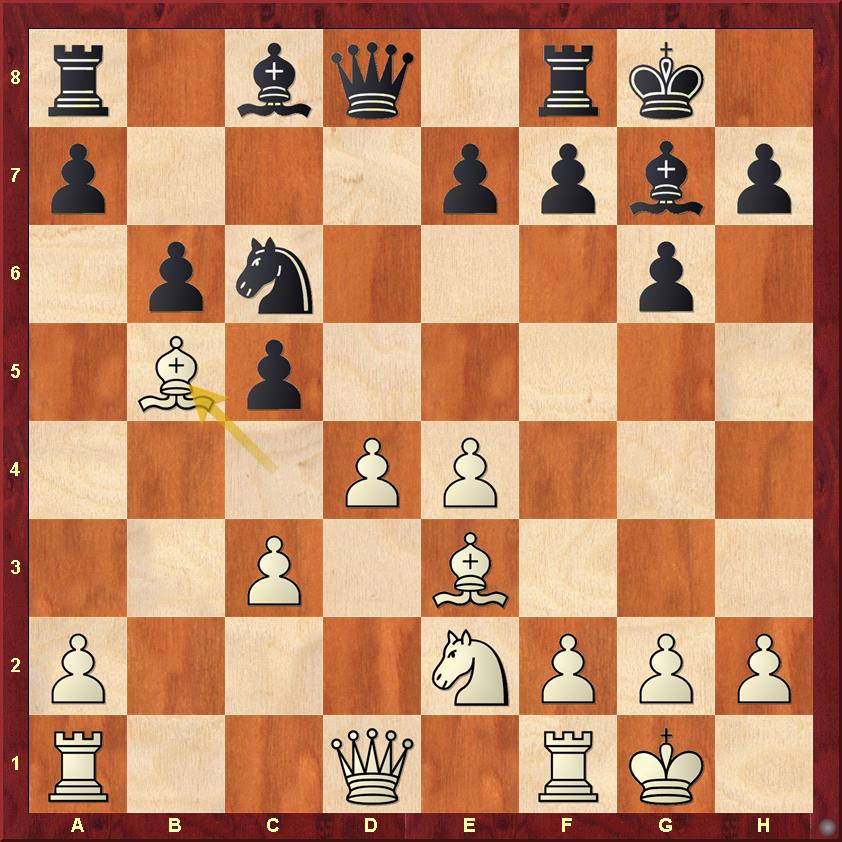
The strength of 7.Bc4 against the Grunfeld is sometimes underestimated as far as practical value is concerned. White plays in classical fashion, and Black's best bet is to enter this passive Semi-Tarrasch formation. Here Fat Fritz likes three moves - 11.Qd2, which Fabiano played, 11.dxc5 which has been neutralised after 11...Qc7!, and my proposed improvement - 11.Bb5!?

This move is actually quite interesting, and hasn't been explored much at the top level, save one Giri-MVL game. It leads to positions that are rich in strategic content, and in the limited time I got to analyse this position, I found no clear way for Black to kill the game off. Sure, he has one nice novelty that Fat Fritz finds almost immediately, but White can still press in the critical position arising there.

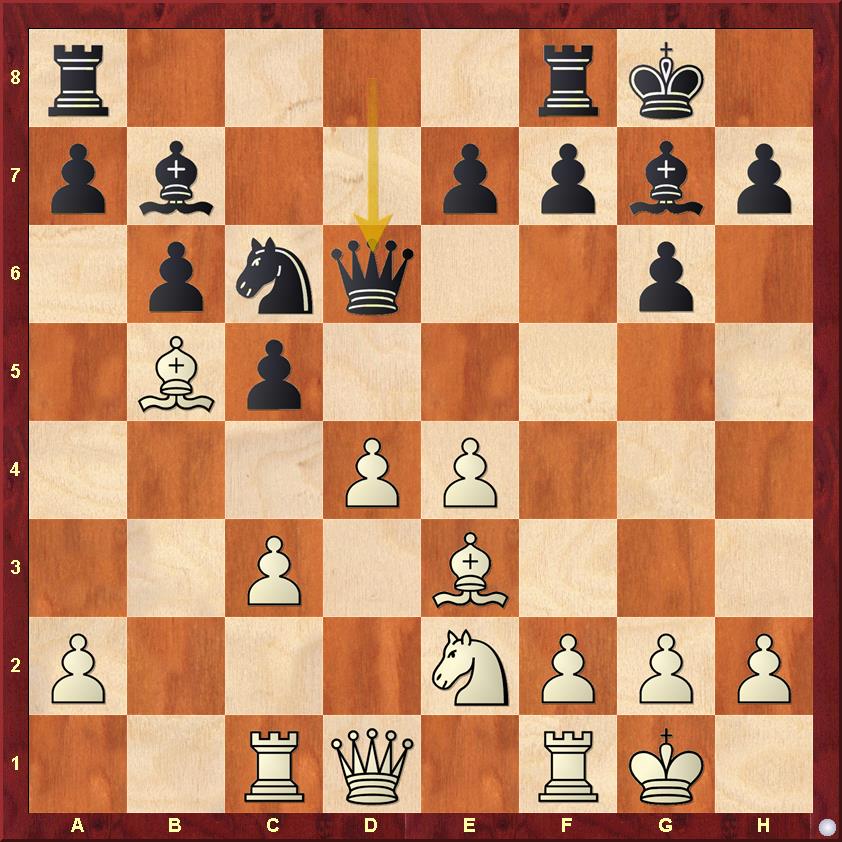
This is the novelty - after 11...Bb7 12.Rc1 Black plays the aggressive 12...Qd6!. It takes a regular engine like Stockfish some time to appreciate this idea, but for Fat Fritz this is a move it sticks with as the best from the beginning. Black's main idea is to keep the positions of his rooks flexible, and not commit to anything drastic. This is the hardest nut to crack as far as an opening advantage is concerned, but I have managed to find some resources here, which should interest both sides. Before analysing this in depth let us look at the old move 12...Rc8.

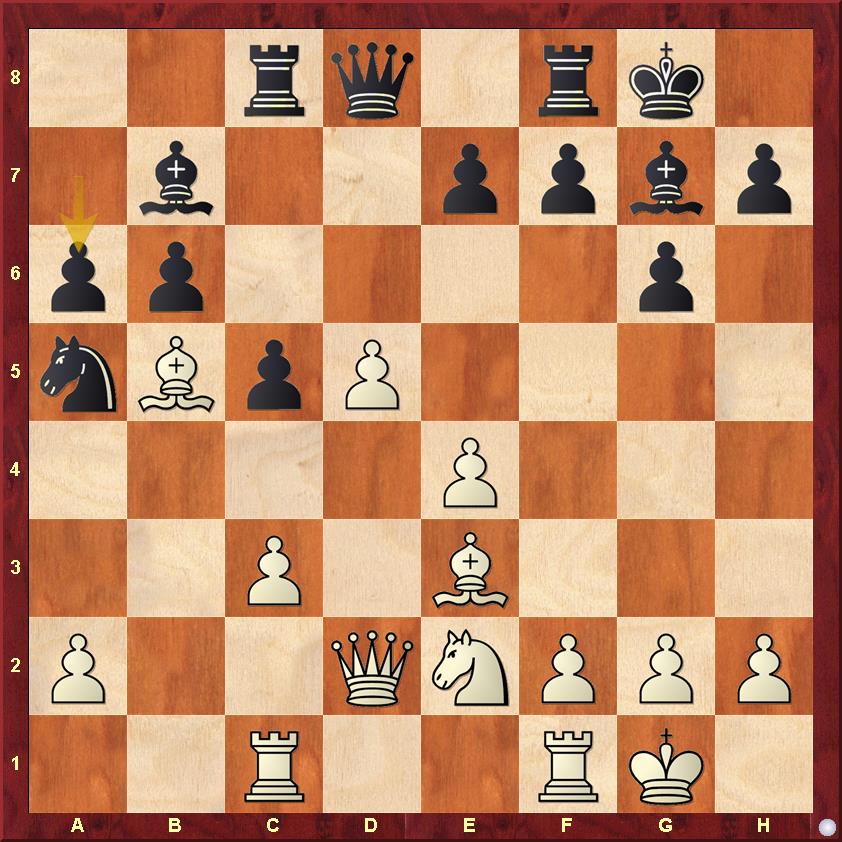
The Giri-MVL game went 13.Qd2 Na5 14.d5 and here Black's best try to equalise is not Maxime's move 14..e6, but 14...a6!?N as shown here. After a forced sequence we can reach the next diagram:

Black is still not fully equal, and he has to suffer for quite a while here to slowly bring the game towards a draw. This is why I don't quite like the solution Maxime chose on move 13, and I instead recommend 13...e6! as Black's best try for equality.

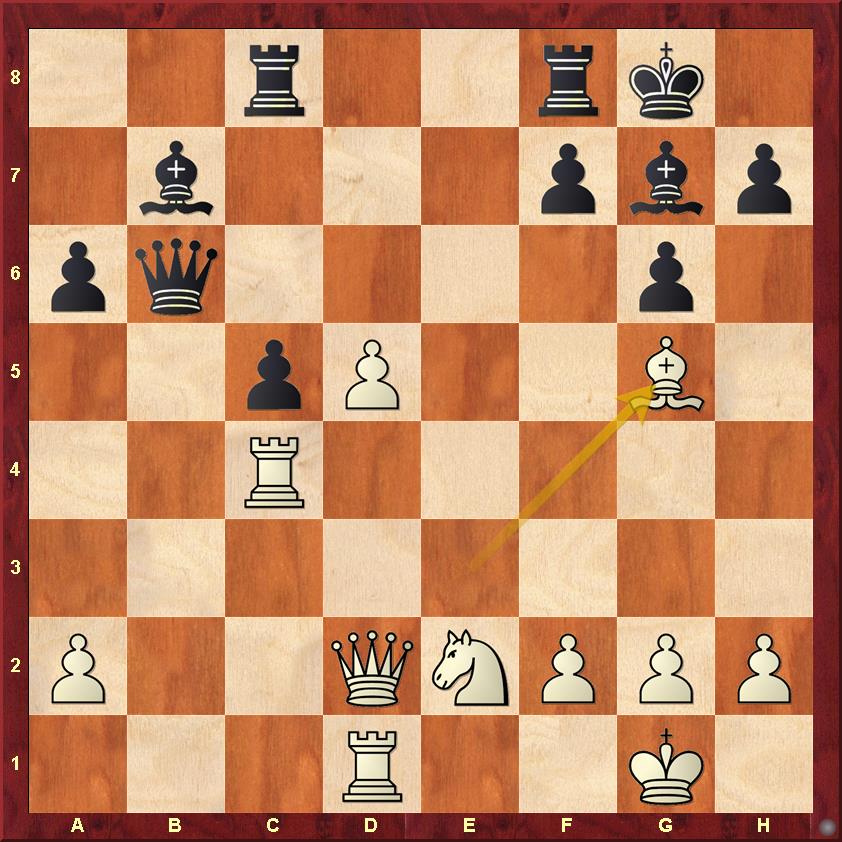
This position is from the stem game Giri-MVL. Here can you find the best way for White to obtain a one-sided advantage?

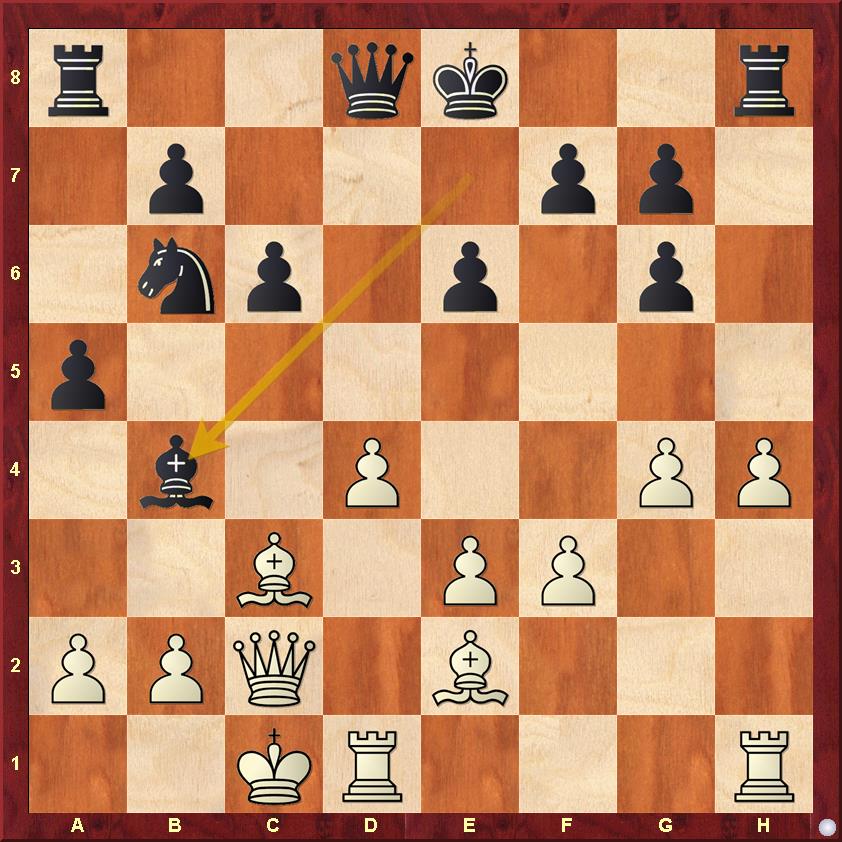
Now, returning to the main move 13...e6! after 12...Rc8 13.Qd2, the following sequence of moves reach the above position - 14.Rfd1 cxd4 15.cxd4 Na5N 16.Rxc8 Qxc8 17.Bg5 and now the important move 17...a6!, preparing to solidify the knight on c4 with b5.

The reason I don't quite like 12...Rc8 as much as 12...Qd6!N is this - even if Black finds all the best moves, after 20.Rc1 Fat Fritz gives White around 0.25, which is the advantage he carries since move 1. The position here is also not that simple to play for Black - he still has to be accurate enough if he wants to equalise the game. Thus, my preference for the main line.

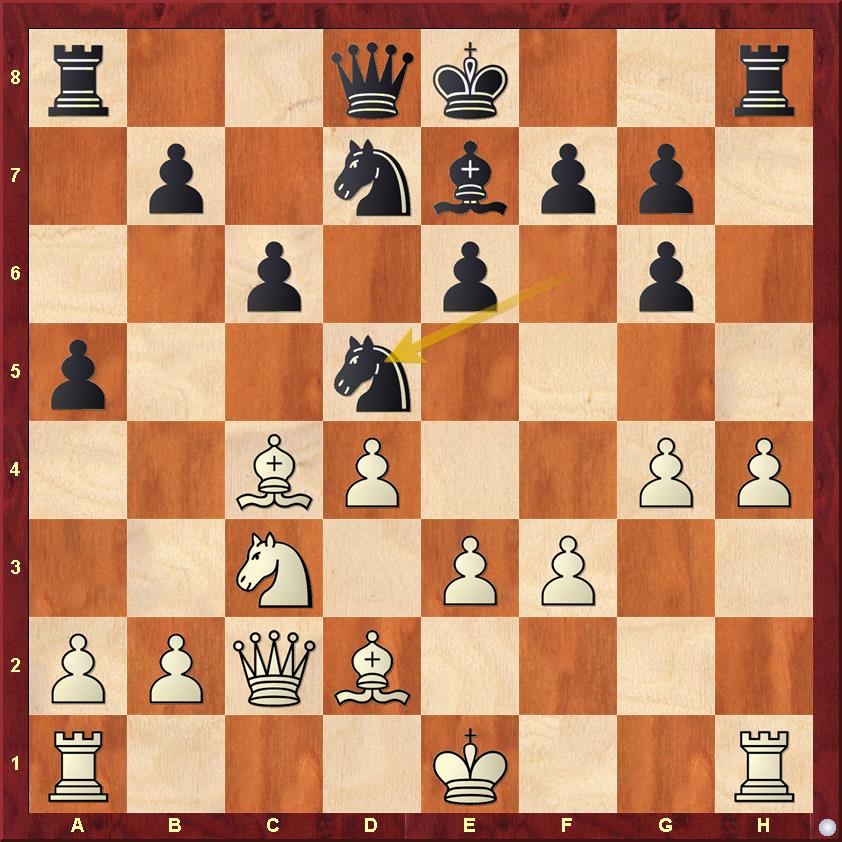
Now, we shall return to 12...Qd6 - 13.Qd2 ( the best, read the notes to understand why) cxd4 14.cxd4 and now the surprising move 14...Rfc8! is Black's idea in this line. To understand exactly why this is good, go through the analysis carefully.

When the other rook comes to c8, this idea of e5 loses for Black. Can you see why?

I hope you noticed the difference! Here White has nothing better than 18.h3 Rxc1 19.Rxc1 exd4 20.hxg4 Rc8 and Black is fine because the huge pawn mass can't advance easily.

Another reason why Rfc8 is the best move in that given position - Black can afford to trade queens after 15.Rfd1 a6 16.Bc4 Qb4!. The differences are really minute, but they end up changing the evaluation quite a bit. That's granular analysis for you!

After some work with the engine, I decided to recommend 15.h4!? as White's main try in this position, even though this is not the 1st choice of the engine. My reasons are made clear after 15...Qb4! 16.Qxb4 Nxb4 17.Nc3 e6 18.h5!? (see next diagram).

According to me White retains some pressure in this ending, and the presence of both rooks should favour the attacker, which is White here. An evaluation of 0.18 by Fat Fritz shows it too sees the dangers in Black's positions, even if objectively he should equalise in the long run. The line in general needs a lot of tests for a definite final evaluation, but I like White here.
The last two ideas will be mentioned in brief here, as compared to the two above I didn't have too much time to spend on them:
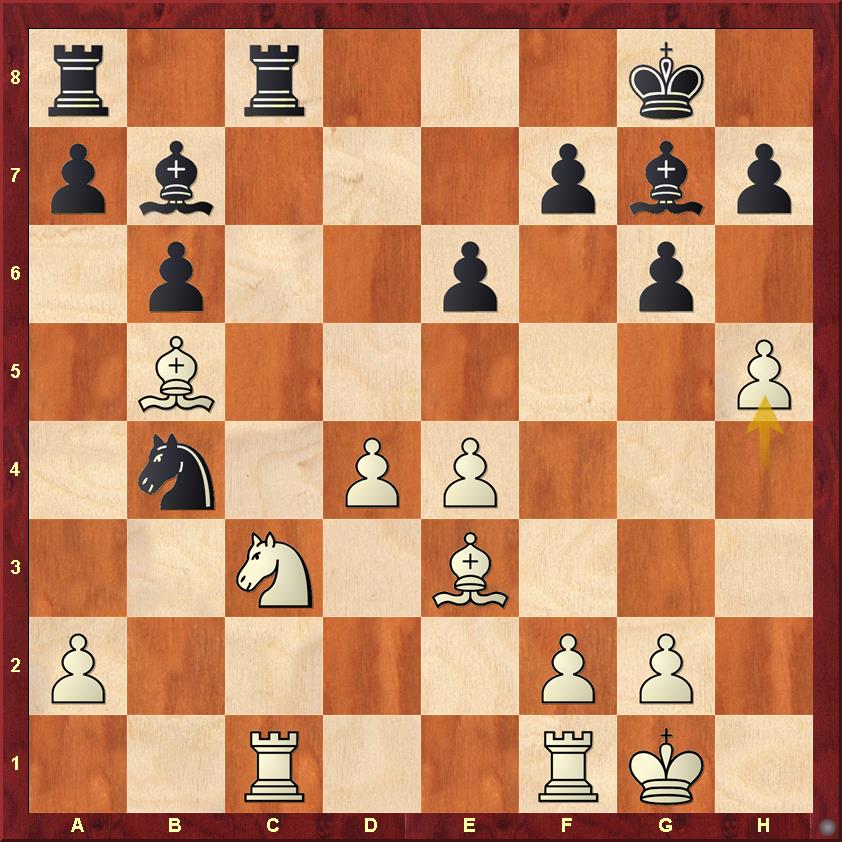
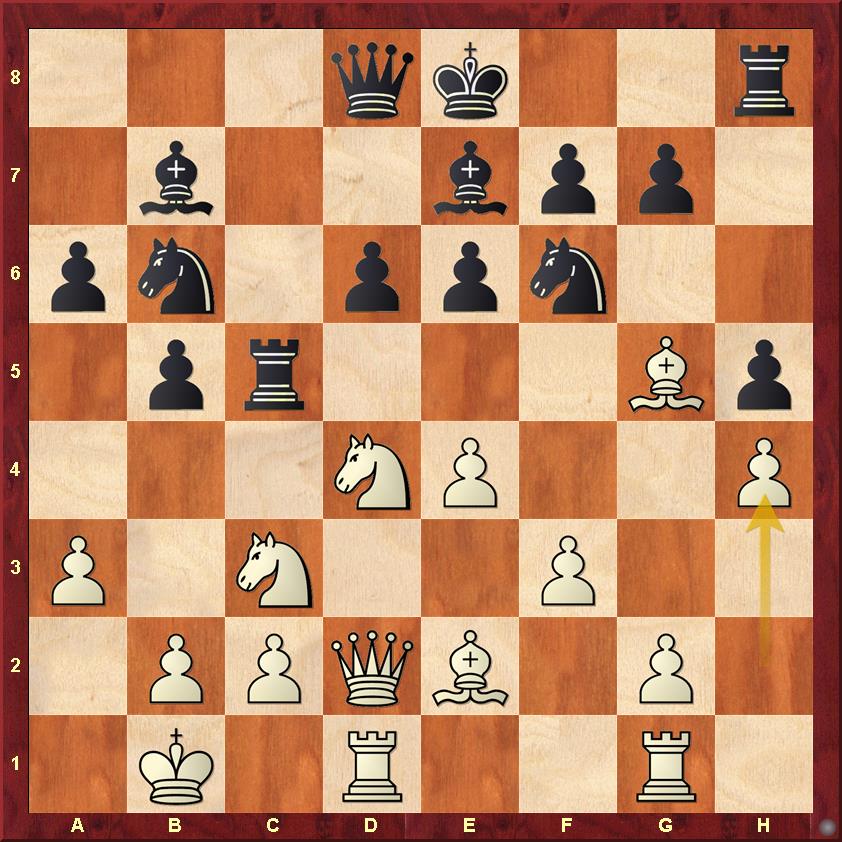
Alekseenko-MVL

Instead of 14.Qe1, as played by White in the game, I propose the interesting continuation 14.Bg5 Rc5 15.h4! as an interesting try for players on the White side. Fat Fritz gives White 0.40 here, which is not to be underestimated, and I have attached a few sample lines for further exploration by the readers.
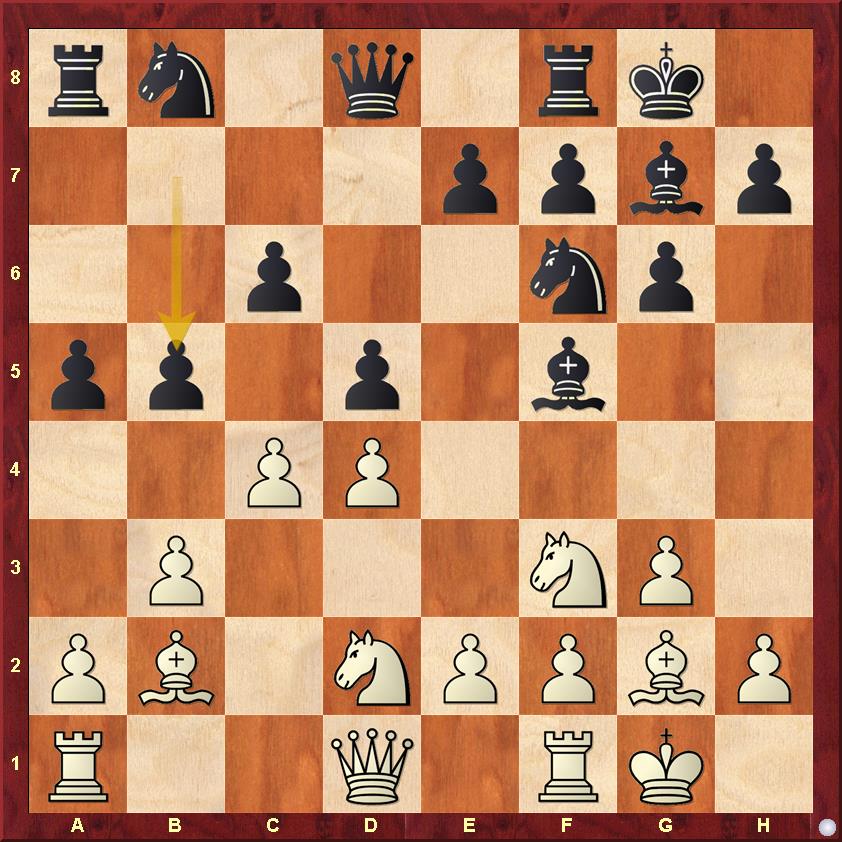
Wang-Alekseenko

Instead of 9...a4 which Kirill tried in the game, 9...b5! seems to be a more ambitious alternative. Black is fine in all variations, and I have provided some examples.
You too can now use Fat Fritz for your analysis. It comes along with the Fritz 17 software:
About the author:

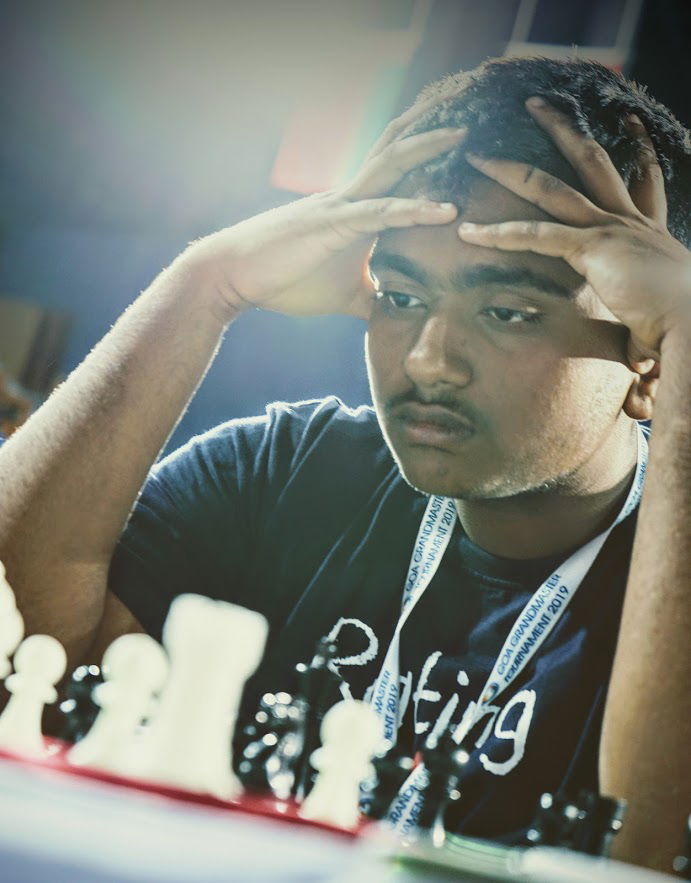
Tanmay Srinath has been writing for ChessBase India since quite some time now. His tournament reports and depth of analysis have been widely appreciated. Pursuing a full-fledged career in engineering Tanmay doesn't get enough time to pursue chess, but he loves to follow top level encounters and analyzes those games with his Fat Fritz engine. With so many complex games being played at the Candidates, we thought it would be a perfect time for Tanmay to use his expertise of working with Fat Fritz to check the analysis of these world class players. We hope you find his analysis useful in your games.
